SmartScan Label Link
 What Is SmartScan Label Link?
Label Link is middleware developed to give QuickBooks users the ability to quickly and easily print bar code labels from your QuickBooks item list or transactions.
No more exporting your product information to a spreadsheet or text file before printing your barcodes. Label Link connects directly to QuickBooks to retrieve item and bar code information.
No more setting up multiple print jobs to print different quantities of your product labels. Choose any combination of items and quantities and print your labels in a single print run.
Print item labels based on information from Purchase Orders, Sales Orders, Invoices or your QuickBooks item list.
Click here to see the barcode label printing slideshow demo!
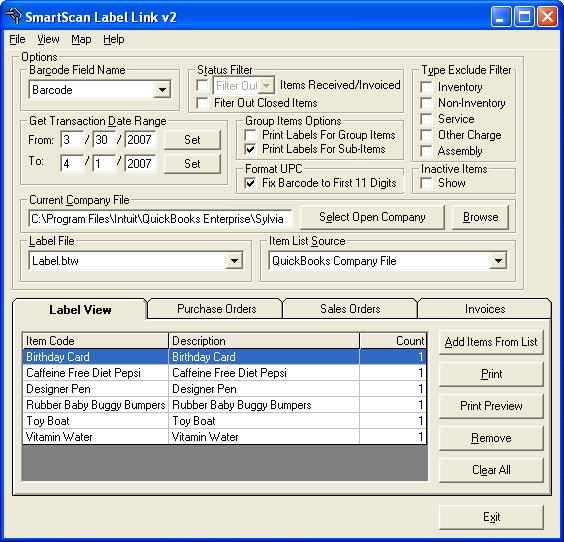
After selecting the QuickBooks company that you would like Label Link to use as its source, you define where the value for the bar code is located (i.e. see Barcode Field Name and Item List Source below). You also decide if there are certain QuickBooks Item Types that you would like to exclude from your list (i.e. see Type Exclude Filter below). Finally you need to tell Label Link which label format you wish to print by selecting your predefined label from the Label File list (i.e. see Label File below). You are now ready to tell Label Link which of your QuickBooks Items to print labels for. Select the "Add Items From List" button and the list of your QuickBooks Items will appear along with a field for entering the quantity for each label to be printed. When you are finished telling Label Link which items you want to print and how may labels of that item should be printed. you hit the "Print" or "Print Preview" button and the labels are printed from your bar code labeling software. It's just that simple.
If you would rather use QuickBooks Purchase Order, Sales Order or Invoice detail as your source for the label information to appear on your labels, first set the "Status Filter" to determine if Received and Closed Purchase Orders and Open Invoices and Sales Orders will be included or excluded. Next set the date range and when you select the "View PO List" button the list of Purchase Orders that fall within the date range that you entered will appear. When you highlight a Purchase Order and hit the "Select from PO" button, the items in the Purchase Order will be listed along with the quantities entered from the Purchase Order.
 |
Label Link license cost: $295.00
Label Link and Wasp Labeler Bundle pricing: $375.00
SmartScan Sales
(206) 932-9986 |
|
|
If you do not have a bar code labeling program, the following program is in stock and available:
Wasp Labeler v7
- Easy to Use.
- Full Featured.
- Creates all of the most popular bar code symbologies.
- Has built in templates for Avery sheet labels.
|
|

|
- All Windows updates including service packs, .Net and Windows
- Genuine Advantage Tool
- All QuickBooks Updates
- QuickBooks 2006 or newer, Pro, Premier or Enterprise
- PC running Windows 2000, XP, Vista or Windows 7
- Mouse
- 32mb RAM
- 30mb free hard drive space
- Bar Code Labeling Software (Bartender, Barcode One, Wasp)
|

|
Wasp Labeler will work with many different printers. If you plan to print large quantities of labels or need labels where durability is of great importance, then a Thermal Transfer printer may be the solution:
Datamax-O'neil E-Class Mark III
The Datamax-O'neil E-Class Mark III printer can create extremely durable barcode labels. The right media and ribbon combination must be selected in order to create long lasting, quality labels to withstand temperature extremes, ultraviolet exposure, chemicals, sterilization and more. * Label supplies and ribbons sold separately.
High performance all purpose, 4.25in width Thermal Transfer
Printer:
$595.00*
Click here for additional information |
 |
 |


 What Is SmartScan Label Link?


